This series focuses on how I applied the steps in the Research Like a Pro process for a personal research project. I walked through these steps in a study group I participated in last fall. The first step was to create a research objective. This was mine: Trace the descendants of Robert Dale in search of potential autosomal and Y-DNA test takers. Robert was an agricultural laborer born on 30 August 1801 in Bracon Ash, Norfolk, England. Robert married Dinah Dawson on 13 October 1823 in Wreningham, Norfolk, England. He died in April 1879 in Flordon, Norfolk, England.
The next step in the process was to create a timeline to analyze what I already knew, spot holes in the research, and determine which localities I would be researching during this project. All the events in Robert and Dinah Dale’s lives took place in Norfolk County, England, so that became the subject for my locality guide.
After taking these steps, I used my locality guide to create my research plan:
- Solidify the births of each child to their parents and ensure all children of the family have been discovered. Utilize church records and the England and Wales Birth Registration Index, requesting original vital records as needed.
- Trace each child as fully as possible in census records from 1851 – 1921. Identify additional generations along the way.
- Use birth, marriage, and death registration indexes to confirm generational links, requesting original vital records as needed.
Once my plan was created, I performed the research, tracking my work in an Airtable research log and creating a family diagram using LucidChart.
With my research completed, the next step in the Research Like a Pro process was to write my research report.
Reasons for Writing a Research Report
Writing a research report takes time and effort. However, it is worth it! Here are a few reasons for writing up your research:
- Writing helps you organize the information, process what you have learned, correlate the evidence, and draw valid conclusions. I am always surprised at the discoveries I make after I think my research is finished. These discoveries happen as I write!
- Writing a report helps you remember what you did during a research session. You think you will never forget what you have discovered and how you discovered it, but you will!
- Your report will act as a starting point for you when you want to pick up the research again. By including future research suggestions in the report, you can remember the ideas you had as you were researching and pick up right where you left off.
- A report is a shareable document that you can add as documentation to your family tree. When you share that family tree with others or place the documentation on the global FamilySearch tree, you are validating the information you have added to your ancestor’s profile.
- A written conclusion is one of the requirements for the Genealogical Proof Standard,1 which includes:
- Reasonably exhaustive research.
- Complete and accurate source citations.
- Thorough analysis and correlation.
- Resolution of conflicting evidence.
- Soundly written conclusion based on the strongest evidence.
What to Include in Your Report
A research report should include the following elements:
- Introduction and Basic Information: The author, date, and subject of the report.
- Context and Background: A summary of past research to help understand the results of the current research.
- Purpose and Focus: An explanation of the report objective, including specifications by the client.
- Limitations and Resources: Any restrictions on research hours, access to information, expenses, or other resources.
- Content and Format: A report structure that focuses on the research goals, including well-reasoned explanations of why any research goal or purpose was or was not met.
- Presentation of Findings: Details on where, when, and why information was found, presented logically.
- Inconclusive Results: Descriptions of searches that do not find evidence (along with findings of direct, indirect, and negative evidence) in sufficient detail to avoid unnecessary future searches of the same records.
- Explaining Gaps: If the research did not meet the objective, a clear explanation of why and where it lacks, along with suggestions to make further progress on the objective in the future.
- Protecting the Report: Measures taken to prevent alteration and loss or separation of any part of the report.2
A template for report writing that will help the writer meet these standards was one of the things included in the Research Like a Pro study group. The sections of the report template include headings for the Objective, Limitations, Results Summary, Background Information, Findings and Analysis, Conclusions, and Suggestions for Future Research. Each report I write includes these basic elements, but I also include other things to help present the information, including tables, maps, and figures. I have created my own templates for my client reports and other written products. I will be sharing tips for creating templates in an upcoming blog series, Putting Microsoft Word to Work for You.
Writing the Report
I had already begun writing by the time I got to this point. If you remember, I wrote my objective at the beginning of the project, and I wrote my background information section during the research planning phase of the project. I copied and pasted these elements into my report. I was now ready to write the rest of the report. Most often, I organize my reports by record type or by person, based on what will work best for my objective. As I write, I provide reasoning for each record type that I searched during the research process, and analyze and correlate the evidence as I go. Because I was tracing several generations of a family, I decided to format this report a little differently than I usually do.
In the Findings and Analysis section of the report, I first added information about the different record types I consulted during the research session:
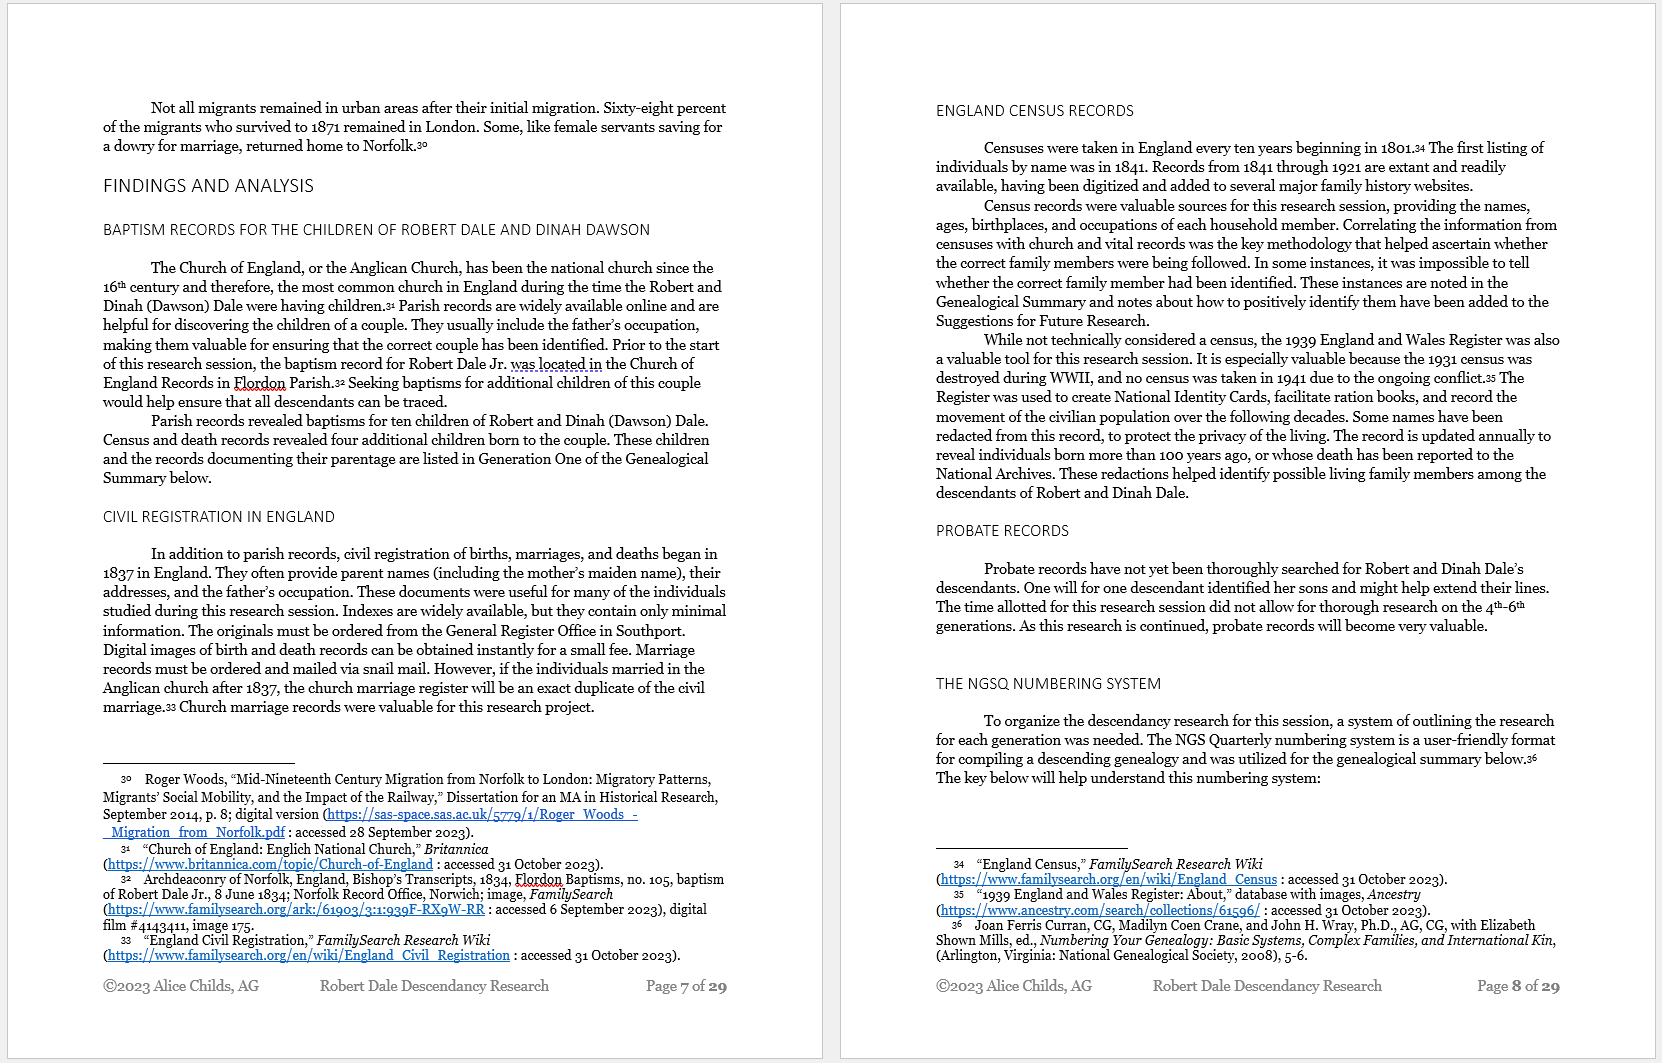
Next, since I would be presenting many descendants of the research subject Robert Dale, I decided to create a Descending Genealogy using the NGSQ numbering system, outlined in a book called Numbering Your Genealogy.3 I felt like this would be the best way to present the information so a reader wouldn’t lose track of who was who. I provided a key in the report so the reader would understand the system:
Generation Number: a superscripted, italicized number following the first name of a person in a main entry and the first child in a child list. Example: Robert1 Dale.
Individual Numbers: Every person is assigned a person number. This number is followed by a period for a main entry and no period in the child list. The numbers do not start over with each family. Example: 1. Robert1 Dale.
Child Lists: Children in each family are numbered with small Roman numerals following their individual numbers. Each child in a family who has a main entry in the next generation is designated with a + sign before his or her individual number. Example: + 2 i. James2 Dale.
Generational Reference: When an individual is listed in a main entry, their descent from the original ancestor is listed after their name. Example: 42. Rosa Lillian4 Dale (William John3, William2, Robert1).
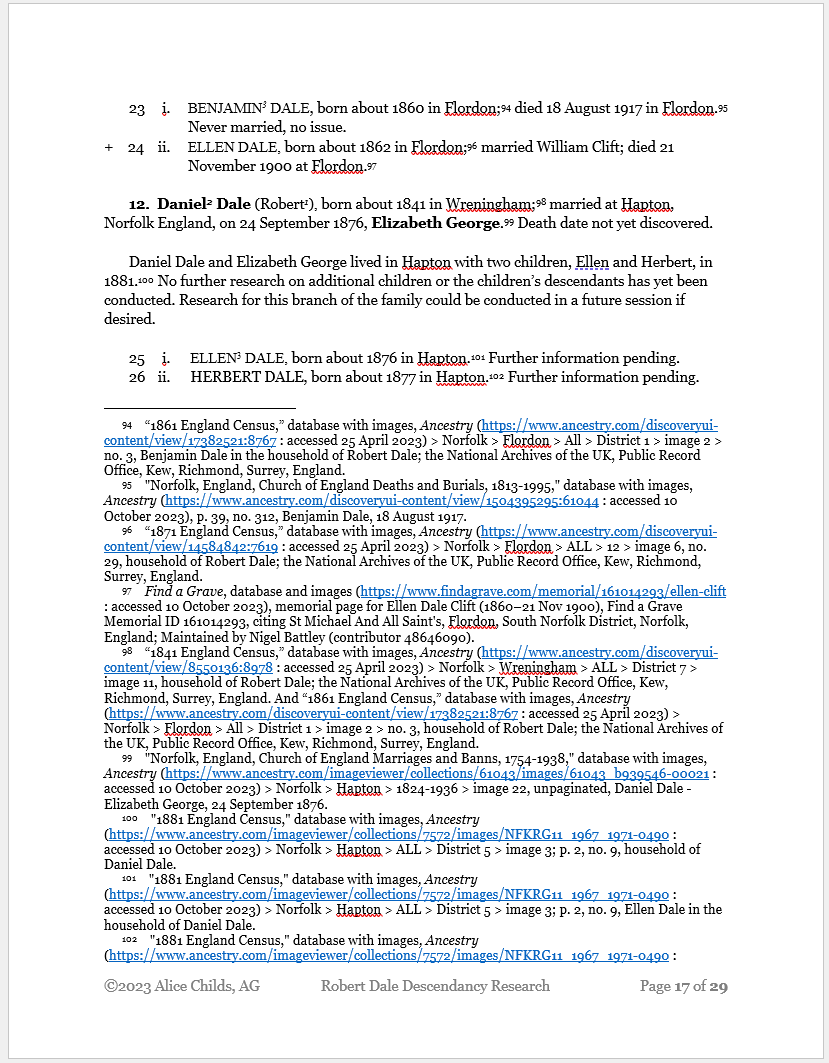
I titled this section of my report “Genealogical Summary” and presented a source-cited descending genealogy of Robert Dale and Dinah Dawson. I ended up tracing some lines down to the fourth or fifth generation. Here’s a look at one section:
I was happy with the way this report turned out. Here is my report conclusion: “At the conclusion of this research session, much progress was made toward the objective of discovering DNA test takers among the descendants of Robert and Dinah (Dawson) Dale. Two possible autosomal DNA test takers have been identified. Modern records could reveal whether they are still living, or whether they have children who could take a test. The research on other lines in the family has laid the foundation for further work that can be done to seek additional candidates for DNA testing.”
After writing the report, I created a summary of results, which I placed at the beginning of the report. As I wrote, I also created a robust list of future research suggestions that I included at the end of the report. This list will help me continue to identify DNA test takers as needed going forward. If you are interested, you can read my report in its entirety here: Tracing the Descendants of Robert and Dinah Dale.
Continuing the Research
Although I finished the Research Like a Pro study group last November, my research on this project hasn’t ended. Over the last few months, I have been able to identify two living descendants and get their contact information. I recently sent them letters via USPS to explain my research and invite them to take an Ancestry DNA test. I am keeping my fingers crossed that I will hear back from them soon and that they will agree to help with this project!
- Board for Certification of Genealogists, Genealogy Standards, second edition, revised (Nashville, TN: Ancestry, 2021), 1–3.
- Board for Certification of Genealogists, Genealogy Standards, second edition, revised (Nashville, TN: Ancestry, 2021), 40-42.
- Joan Ferris Curran, CG, Madilyn Coen Crane, and John H. Wray, Ph.D., AG, CG, with Elizabeth Shown Mills, ed., Numbering Your Genealogy: Basic Systems, Complex Families, and International Kin (Arlington, Virginia: National Genealogical Society, 2008), 5-6.